Showing posts with label Male card. Show all posts

Sunday, 15 September 2019

Come Sail Away Card In A Box

A card in a Box is such a fun style of card to make. I love how it looks when it arrives flat through the mail, and it's even better to see the surprise on the recipient's face when it folds out to sit up as a little scene in a box. 
I've used products from the Come Sail Away Suite in the 2019 -20 Annual Catalogue - specifically the Sailing Home stamp set and the Come Sail Away Designer Series Papers.

The card can look quite different depending on which way it is flattened out, so it's always a good idea to check as you are designing, so that it looks good both flat and standing up.


I coloured the boats with Blends.


And here is the completed card standing as it should!


Just a quick post today. If you'd like further assistance with making a card like this please feel free to contact me.
All the products I used in the Set Sail Card In A Box are listed below. You can shop on-line by selecting the image of the item you would like.


Product List

Tuesday, 25 June 2019

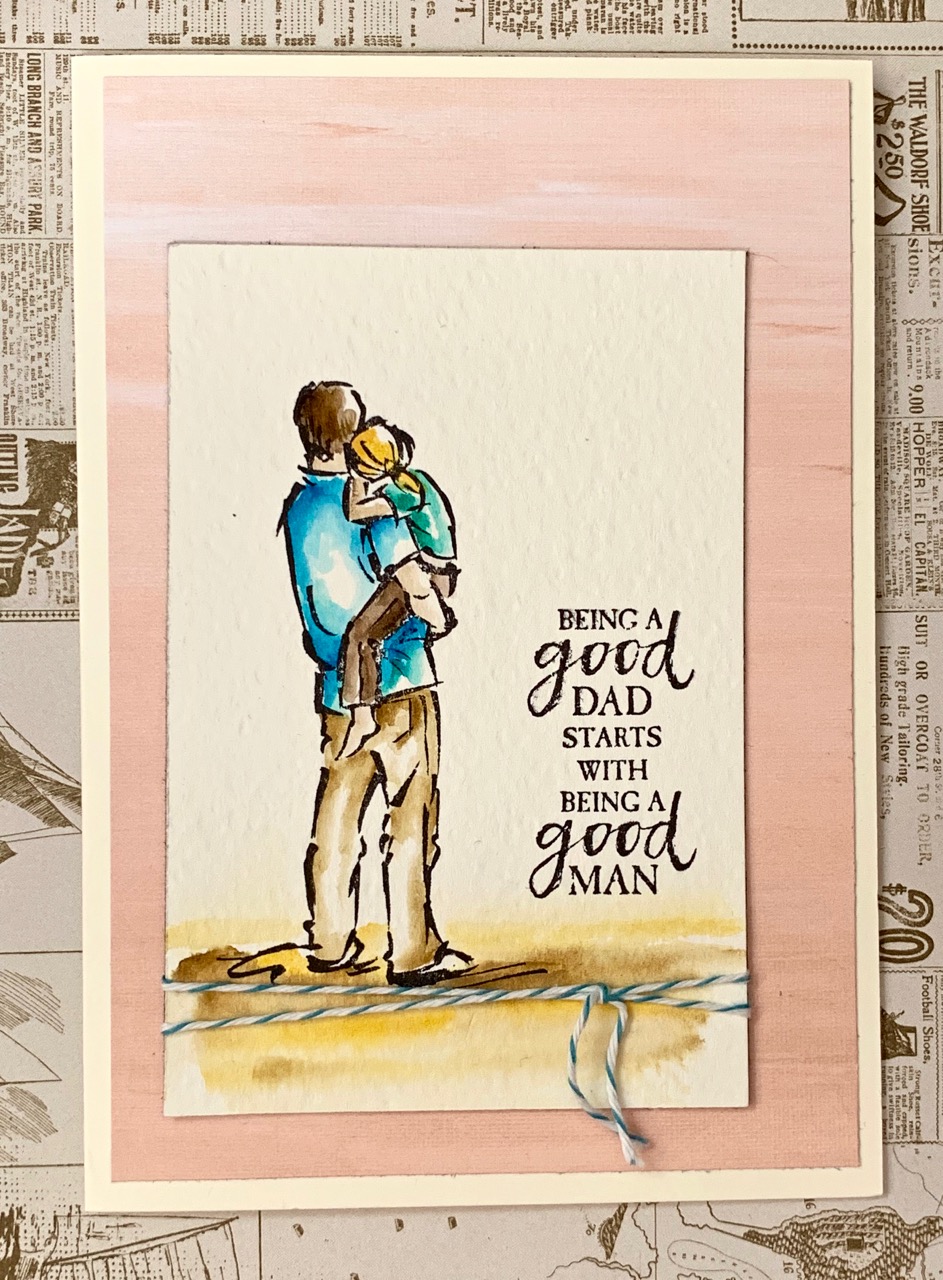
A Good Man Perfect For Father's Day

A Good Man is the perfect stamp set for a Fathers Day card and is a wonderful outline stamp set that is just made for colouring. You could use markers, alcohol Blends or watercolour with Classic Inks like I have done.

I love the freedom of water-colouring stamped images - there is no stress to get the outlines accurate and you simply colour the image.
I stamped using Archival Black Ink but Stazon or any permanent ink is fine. I've used water-colour paper, Stampin' Up! classic inks and and Aqua Painter.


One of the tricks I use to create a real water-colour look is to leave plenty of white space. This image took just a few seconds to colour using the outlines as guides for shadowing .


 The stamped and coloured image is matted onto paper from the Perennial Essence Designer Series Paper pack prior to adhering onto a thick Vanilla A4 card base. A little Bakers Twine - Night of Navy and Sahara Sand has been tied around the water-colour paper to bring the blue from the shirt down through the composition.

I hope this quick card has inspired you to create a card for some special male in your life. You can find a list of the products I used below, and if you wish to order any of them you are welcome to use my On-Line Store. To make it easier you can click on the image that interests you and you will be taken to the store where you can find further information.

Until Next Time
Happy Stamping!


Product List

Thursday, 22 February 2018

Watercolour Birthday Boy Epic Celebrations

I don't know about you but I find making cards for the boys in my family much harder than for the girls. This stamp set from Stampin' Up! - Epic Celebrations - is just perfect for teenagers or even "want to be" teenagers, so it was the obvious choice for my grandson who will turn 10 this week. 


I enjoyed water colouring the sneakers using my Stampin' Up! water color pencils and an Aqua Painter. 

HOW TO USE WATER COLOR PENCILS
This is such a quick and easy way to colour:
I have used 2 methods on the shoes. 
*The first is colouring with the pencil, directly onto the paper and just along one edge of the area to be coloured. Then use a clean Aqua Painter to blend the colour away from the edges and form some contours of the shoe. Add more colour as needed.
* the second is using the pencil as a palette. Touch the tip of the Aqua Painter directly onto the colour on the tip of the pencil and paint onto the desired area. The soft pigment in the pencil will transfer to the brush. This method is great for adding more depth to the areas already painted.
* Create shadow with a little grey and blue.


I combined the stamped image with some of the elements from the True Gentleman Suite. The colours in this suite are really awesome and the accessories like the Night of Navy Corduroy Ribbon, add the finishing touch to the card. The background paper is from the True Gentleman Designer Series Paper pack. This has an abundance of beautiful masculine patterns that help create quick backgrounds for your stamping. 

And here is another card using some of the other images in Epic Celebrations.


Epic Celebrations is a Sale -A-Bration stamp set from Stampin' Up! that you can earn for free, simply by placing a $90+ order. If you would like to own this set you may shop Stampin' Up! products via my On-Line Store, then simply select your choice of Free Sale-A-Bration products to the value earned. 

I will finish this post with offering each of you a fabulous opportunity to join Stampin' Up! during Sale-A-Bration. You get all the benefits of being a member of the SU family, including a terrific discount, training, flexible work hours etc,.During SAB you create your own Kit to the value of $235 and then ADD 2 additional free stamp sets of your choice. Depending on your choice this can be well over $100 of stamps for free and that is in addition to all the heavily discounted items you choose for your Starter Kit. That means potentially over $400 worth for just $169. You also get a set of current catalogues, some order forms and other business stationary all for the low price of:

$169


Product List

Thursday, 3 March 2016

Traveler Reflections with Stampin Up.

I love to travel and in particular, I like to take cruises, so I designed this card with my next trip in mind.  Let's just hope the water is this calm!

I also wanted to show my Tuesday Craft group a new technique - that of creating reflections using Window Sheet from Stampin' Up! I used the fabulous Traveller Stamp Set on the Thick A4 Card Stock


The card is made mainly using Early Espresso Classic Ink, water, water-colour technique and a little sponging. Those of you who follow me regularly will know my love of Early Espresso Ink and how it gives this lovely pinky tone when water is added to it. The only additional colour is some Blushing Bride sponged onto the top left corner of the sky. The "mountains" in the background are created with an Aqua Painter and Early Espresso Ink.


You can see the torn edge detail in this photo - it also has been sponged with Early Espresso.

If you would like to learn this technique you might like to subscribe to my new service:
CLASSES AT YOUR FINGERTIPS. This service will be starting next week, so pop back then to have a look at what I'm offering.

I'm excited to start up these classes for those of you who want to attend classes but find it impossible due to other commitments.

You may prefer to work at your own pace in the comfort of your own home - these classes will suit you too.

Below you'll find a list of the products I used - all of them are available from my on-line store
You can also select the shopping trolley in the side bar to place your order. Don't forget to use this month's HOSTESS CODE (top right side bar) to be eligible for the Hostess Benefits. 

Until next time,
Stay Crafty!