Showing posts with label Marker and Acetate Technique. Show all posts

Thursday, 24 February 2011

Mr T's Birthday Card

It is our grandsons birthday today so of course I made him a special card. 


And it just so happens that this card will fit the Midnight Madness Sketch Challenge #92 - simple sketch. Yep, I've turned it on it's side and substituted balloons and an arrow for the outer circles, but you get the idea! 

Tyler loves to stamp when he spends his Mondays with me, so I've tried to include as many of his favourite things as possible in this card: things like buttons, glitter, stars and cars!


I made the little people so you can pull them out of the windows. We have some very old Fisher Price "little people" (that I actually bought for Tyler's mummy when she was about his age) that are one of his favourite playtime items - great for developing the imagination.


I've created the background by drawing with my Stampin' Write Markers directly onto acetate then pressing onto white card stock, and I've heat embossed the little car. Some Stampin' Up!® buttons have been added to the wheels.

The balloons are from the SU "Party This Way" stamp set. I've coloured over the patterns in the red ones with my Real Red Stampin' Write Marker as it was just too much pattern using the stamp on all 3. The number 3 is created from the Big Shot and the Medium Sizzlit Dies "Timeless Junior Type Alphabet" which obviously includes numbers!


The "party this way" sign is coloured using the marker direct to rubber technique which lets me print in 3 colours at the one time. Such a time-saving technique and so easy to use. Then I've simply coloured in between the lines that outline the arrow.


The spotted Turquoise background is created with an embossing folder and the Big Shot. I love my Big Shot because it is so versatile and will accept folders and dies from all other brands on the market.

Well, I hope you've enjoyed seeing the card. It was fun to make and I'm sure Tyler will take a look at it then find something else to play with!!! Typical 3 year old, but we love him dearly. 

If you'd like any further information on these techniques or products, you are welcome to contact me

Sunday, 20 February 2011

Try The Acetate and Marker Technique

For my February Stamp A Stack class I'm going to teach the participants 2 new techniques. Both of them are quite quick, but will open up enormous creative possibilities when used in a variety of ways.

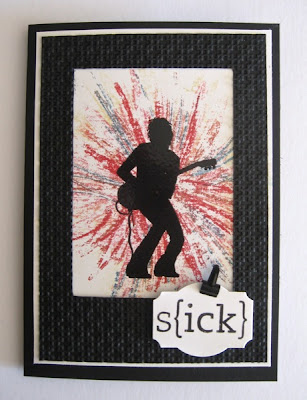
This technique - Acetate and Marker - is one I've just started to experiment with, and I'm finding it lots of fun. I created this card for teenagers, as one that will be on the agenda for the class, and I love the idea that different colours can be used for each of the cards with a simple wipe of the Acetate sheet.


Don't you love the background? You'll find Acetate  on page 122 of Stampin' Up!'s current  Idea Book and Catalogue under the label WINDOW SHEETS.  I find the THICK Window Sheets work best for this. You can cut them in 4 pieces for easy handling for these projects, and they also make great additional transparent sheets  for your Stamp A Majig. 

Draw the desired scene or pattern directly onto the Acetate, being careful to start with your lightest colour, then add other colours as desired.

HINT: Remember these colours are somewhat transparent, and will make neutrals if you overlay them too much. 

This is quite an experimental phase for you to enjoy. Try different colour combinations, try huffing on the Acetate before turning it over onto Whisper White card. I tried spritzing with Shimmer Mist made from Shimmer Paint (page 143) - this dulls the colours but makes for an interesting background. 


You can see in the detail that a great sketchy looking background can be achieved - so be free with the marker application if you want to achieve this look.

I dried the print with a heat gun then stamped the guitar player image in Versa Mark and heat embossed with Black Embossing Powder (page 141). The Frame is made using the Big Shot from Stampin' Up!®  and the Square Lattice Embossing folder.

Notice the tiny clip attached to the greeting? You'll find those great fun to use on cards - they are called Mini Library Clips (page 139 of the Idea Book and Catalogue) and the greeting is from the brilliant Word Play Stamp set (page 103). I've selected part of the phrase and coloured directly onto the rubber  with my Black Stampin' Write Marker.
I'm entering this card in the following challenges:
Paper Sundaes- Masculine Colours
2 Sisters - Embossing (I've used both heat and dry embossing)
Easy Craft Projects - Something for the Boys

Here is another example to show you how this technique can be used as a background for scenes.


If you'd like to have a play with this technique you are welcome to join my classes or organize a technique class for yourself and some friends.  Just contact me for further information.

I hope you've been inspired to try this technique and I look forward to seeing what you come up with.

Until next time

Stay Crafty