Showing posts with label Brown Paper Album. Show all posts

Monday, 3 December 2012

Another Stampin' Up! Heartfelt Project

Here's another of the projects I created for the recent Stampin' Up! Heartfelt Event in Sydney. 
As many of you know I really enjoy making these albums from brown paper packaging and have a number of interpretations - they are so much fun to do for a variety of events and of course, with Christmas just 22 days away - this project would make a great gift for any of your loved ones. 

I used a SIMPLY SCRAPPIN' KIT  - Merry Moments, from Stampin' Up! to make this project - it saves time as all the elements are adhesive backed and as usual with Stampin' Up! products, beautifully colour coordinated and pattern coordinated. This kit can be found in the HOLIDAY CATALOGUE and is only available until January 31st, so make sure you take advantage of my December Special and contact me to place your order today.


You can see how easy it is to add some of the adhesive backed decorative strips and motifs. I've also used VERY VANILLA  card stock embossed with a variety of Stampin' Up! embossing folders to create a Christmas tree. Just cut out a triangular shape (or any shape you like) in cardboard, run the strops of Vanilla card through the BIG SHOT using the following embossing folders: CHEVRON, PERFECT POLKA DOTS and FANCY FAN.  You'll find them on p. 189 of the Annual Catalogue

Here is a close up of the tree.


You can make the pages as intricate or simple as you wish. I've gone for the "less is more" adage in this album as I think the photos I add will be quite busy with lots going on in our house at Christmas time. I plan on printing the photos in Black and White to add to the vintage look of the album.
So just a couple of page ideas for you and of course you'll find that the contents of the Simply Scrappin' Kit inspire you to create your own versions. 


Keep the page layouts simple and add texture to create interest. Find the beautiful LACY BROCADE in the Holiday Catalogue


Ribbon creates lovely focus and decoration for pages too. Here I've used  1cm STITCHED GROSGRAIN RIBBON in PRIMROSE PETAL  colour.


Adding some of the gorgeous CHAMPAGNE GLIMMER PAPER gives a festive spirit to a simple layout. Combine it with some dry embossed card and a decorative edge and then all you need are the photos and some written memories of the day.


The last photo shows how stamp sets and FRAMELITS can be incorporated into the page designs. Just use coordinating ink colours and appropriate images and a whole new dimension is opened up.

I hope this inspires you to try one of these albums. It will truly be a Heartfelt Gift for someones special in your life.

Until next time 

Stay Crafty and Stay Happy


Monday, 10 January 2011

Brown Paper Album Love

I'm gearing up for making lots more of these albums and this one is all about LOVE.  I've shown the cover once before on this blog, but the album is now complete and I wanted to post it on my other blog where you too can add your albums to show the world. Yes, I've created a challenge and display blog
http://jac-inks.blogspot.com   Hop on over and have a look, and please add links to your BROWN PAPER ALBUMS  if you've made any of them.

OK so here is the cover of my LOVE ALBUM:

Front Cover
Back Cover

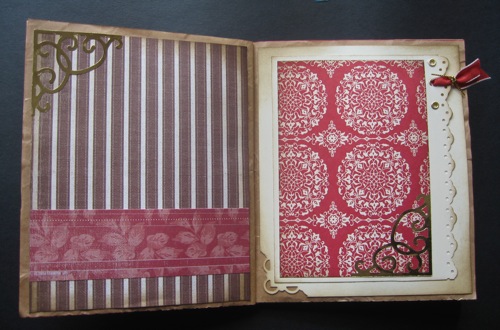
Choose patterned papers and coordinating inks to create a romantic layout. Add some intricate border punching with Stampin' Up!'s Scallop Trim Border Punch and customize areas with the beautiful "Notably Ornate" stamp (#121544)

Sponge plain paper edges with coordinating ink for softer effects.

Create your own page embellishments with the Vintage Wallpaper Embossing folder exclusive to Stampin' Up!, then cut out selected areas to highlight a corner or bottom of a page. Torn edges sponged lightly with ink create a "time worn" appearance to some of your pages.

Tags are an important feature of the Brown Paper Album. Not only do they add character to the presentation of the album, they perform the  functional purpose of creating space for more photos or your journal comments. Dress them up with a variety of punched grips, and treat them as another page for an integrated effect. Note the addition of some Complimentary colour (green) to enliven the pages and add further visual interest.
Tags don't have to be plain and boring. Here, I've randomly sponged ink onto the "En Francais" background stamp by Stampin' Up! before stamping it onto the tag and sponging the edges in Soft Suede Ink. (my favourite ink for Vintage projects)

Create rounded base of tags for easy insertion into the pockets. The Corner Rounder Punch is perfect for this job. The decorative top edges have been punched with the Scallop Trim Corner punch.

Each side of the tag can be treated to coordinate with the pages it relates to. This photo show you the reverse side of the tag pictured above.

I hope you've gained some ideas for your own Brown Paper Album, and that you'll join me by providing a link to your blog page. The albums can be any topic and use any products. It's just fun to see what others are doing with their Mini Albums. I, of course will use my much loved Stampin' Up!® products almost exclusively. (the patterned papers for this Album are not from Stampin Up but I love the colours and they do match some of our inks)

If you'd like to purchase a kit or a blank Brown Paper Mini Album, please visit my Shop.  I've been busy making more Album kits over the holidays, so there are plenty available.

Just writing about this album has given me lots of ideas for new ones and I can't wait to get started.
Please add your links!


Until next time, Happy Stamping


Wednesday, 22 December 2010

Mini Album Page Layout Ideas.

Today I have some great page layout ideas for your Brown Paper Mini albums. The layouts are transferable to any of the Themes that you may have for your album, as they simply show ideas for using patterned papers, embellishments and blank areas to create  versatile pages ready to accept photos and memorabilia.

I'm showing you actual pages that I've already made - just to give you an idea of how things will look. Of course you'll choose your own papers and colours and greetings to suit the album you're making.

I'll start with the cover of my latest Brown Paper Christmas Album: some of the papers I've used are retired and some are available in the current Idea Book and Catalogue. It just demonstrates how easy it is to coordinate products from Stampin' Up!®

The Christmas Album cover - textures and patterns created with the Big Shot, embossing folders and patterned paper, do all the work! The faux metal tag is created with gold embossing powder. (Ask me how if you'd like to learn this technique)


Scallop Edge punch, Top Note and Circle dies combined with floral papers and sponged edges create a good basis for a vintage page. I will add more details after the photos are placed - this is entirely optional!


Textures, corner details and stamped greetings. I love the new SQUARE LATTICE  embossing folder in the Stampin' Up!® Summer Mini Catalogue.

Plenty of room for photos and additional personal embellishments. You can add your written memories onto the tags that hide in the pockets, or you could use these tags for more photos.

Repeat horizontal lines to create balance on a 2 page spread. 


Plenty of space for larger photos. Journal your thoughts on tags that slide inside the pages.
Simple shapes provide a great base - punches make beautiful borders.
Repeat patterned  paper placed at different angles - ample space for titles, brads, flowers or charms.

Texture created with the Big Shot and Stampin' Up Embossing Folders.


These page layouts should be used as a starting point for your own album. If you need assistance to get started - you can copy them directly, or you may just need a bit of an idea to start your own ideas flowing. Either way enjoy the journey.

Why not purchase a Brown Paper Album plus paper kit to get started? It will take all the worry out of  the project and you can start your ideas  flowing for all the future albums. They are quite addictive, but so much fun to make for that special person (could even be for you! lol)

I'd love to see your creative Brown Paper Mini Albums - you can add a link to your blog page by selecting the title.

As always your comments are welcome,


Monday, 8 November 2010

Christmas Brown Paper Album - 1st class.

Whoo hoo! I'm feeling great tonight. I've had a wonderful day crafting with friends- my first class on the Brown Paper Albums, and there were some wonderful creations made. My friend Lovely Linda  was a marvelous "assistant" who made my job easy. I even managed to complete about 5 pages of my own Christmas Album.

Then when I logged on here, I found that I'd won an  "A Cut Above" award from over at Paper Players Challenge # 22 - "Anything Goes".  How cool is that? Thanks ladies I'm very thrilled you like my cards.

Now I want to show you some of what I created today. I will be entering the front cover in the Midnight Madness Sketch Challenge #78.

 I really love the inspiration that comes from these sketches by Priscilla, and thought this sketch would work really well for what I was planning on the cover of my Christmas themed Brown Paper Album.

For once I've used very few stamps on this page. Instead I've concentrated on texture (from my Big Shot embossing folders) and punched edges.
The Christmas Tree is made up of layers of different embossed Vanilla card stock; each with a scalloped edge. I've used 4 different embossing folders: Perfect Polk Dots, Petals-A-Plenty, Vintage Wallpaper (all exclusive to Stampin' Up!) plus another old favourite that has swirls on it.


The tree was drawn free-hand onto some recycled backing card, then I used the template to adhere strips of textured card onto and finally cut around the template to create the tree.

The backing scallop circle has been made cutting the scalloped shape with a Big Shot Scallop Circle die, then pre-inking an embossing folder prior to running it through the Big Shot.

The metallic tag is made by building up 5 layers of gold embossing powder (heating in between each layer!) then quickly stamping the image into the hot and therefore liquid embossing powder. It is essential to cover the stamp in Versa Mark prior to stamping into the embossing powder.


Here's a preview of the first couple of pages, ready and waiting for some photos of the family. I've chosen these colours as they go well with the colours of my lounge room at home, and most of the Christmas photos will be taken in there. I've used a combination of retired Designer Series Papers and the current set, "Love Letter". There is a terrific stamp set by Stampin' Up!® called Artistic Etchings that goes really well with this set of paper.


Hope you are inspired with where I'm going with this album. They are great fun to make: so much fun that I've made up a number of kits for sale so if you'd like one or more you can contact me for further details. Each kit will contain an album made up (containing 10 pages and 8 - 10 pockets), plus a selection of theme related Designer Papers. Card for 8 - 10 tags to insert in the pockets, plus a selection of embellishments. You'll also receive a set of 8 page layout ideas to get you started on your unique project. I am happy to post these if you wish to order them. Postage costs will depend on your location.

I'll be adding some more pages over the next few days, so stay tuned! As always your comments are welcome.