Showing posts with label Card. Show all posts

Monday, 30 October 2017

This Little Piggy - Sweet & Humorous Cards for All Occasions

When the 2017 -18 Stampin' Up! Annual Catalogue was released, one of the stamp sets that caught my eye was the "This Little Piggy" set on page 48. As many of you know I love to colour, and I could imagine this set done in watercolour and this is what I came up with for my daytime class. 


I've used a couple of easy water colour techniques on the card, and found this card to be a good one for technique revision because we included masking as well.

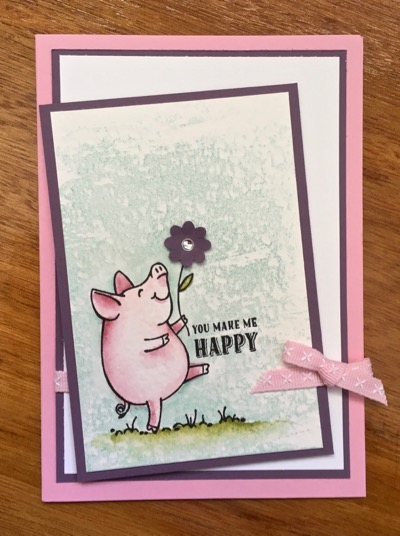
Start with stamping the piggy outline in Archival Black on Water-colour Paper. 
Stamp the same image onto a Post It note and cut out just inside the outline. (Cut inside the line to eliminate the white shadow that occurs when stamping around a mask).
Place the mask over the stamped image of the pig, and ink up the Watercolor Wash stamp set. I don't bother to mount the stamp on a block as I want the background to be a little uneven and I achieve that look by just pressing the stamp down with my fingers. 
Remove the mask and use an Aqua Painter to colour the pig - I used Blushing Bride and Sweet Sugarplum ink for the pig and a little Pear Pizzazz for the grass. Build up your layers of ink to get nice depth in the shadow areas.
Punch out a small flower and raise it on a Mini Dimensional with a Rhinestone in the centre.


Touch up around the edge of the pig with the Aqua Painter and mat as desired. 

Here is another image using all the same techniques, but different colours.


What a happy little piggy! 

Supplies are listed below. You can purchase any you need via my on-line store if you live in Australia.

Until Next Time,

Happy Crafting


Product List

Thursday, 14 January 2016

Bloomin' Hearts in Purple

Hello and welcome to another post featuring some of the fabulous new products from the
Handmade from the Heart Occasions Catalogue by Stampin' Up!

Today I'm featuring the Bloomin' Heart Thinlits Die and the Bloomin' Love stamp set.


 I've used Perfect Plum as my base colour and the Bloomin' Heart die is in Elegant Eggplant. I love these two colours together and a little silver and white give the lift I was aiming for.

The background card has been textured with the Brick Wall Embossing folder - a really versatile 15.2 cm square folder. Love it for so many reasons. 

The card base is made from Stampin' Up"s new Thick White A4 card stock. This is a sturdy 270gm in weight and therefore is perfect for card bases. 

I cut out a heart shape using the now retired Heart Framelits and it fits perfectly behind the gorgeous filigree heart. I raised the Perfect Plum up on Dimensionals to give a lovely lace effect.

A hint when cutting out the Bloomin' Heart Thinlit - and I'm sure you've seen lots of hints on-line already but this is what I find works for me.
Use the Multipurpose platform closed.
 Top with the Precision Base Plate
Add your card stock
Place the Thinlits die cutting side down
Add an Acrylic Cutting Mat
Pass through the Bigshot 2-4 times.
No need for dryer sheets, additional wax or baking paper.
Do move your paper around the Precision Base plate for each new cut.

For quick and easy popping out all those fiddly little bits use the fabulous new Big Shot Die Brush - I promise you will love it!


The flower embellishments are a two step stamp from the stamp set: Bloomin' Love. It coordinates beautifully with the dies. 

The final touches are Wink Of Stella Clear giving a gorgeous shimmer on the flowers, some Rhinestones Basic Jewels and some Silver Metallic thread.

You can find a list of the products I used in the grid below, and if you would like to order any of these you can do so via my on-line store 
 Use the HOSTESS CODE listed in the right hand side bar to be in the monthly draw to win the Hostess Rewards. Don't forget to ensure that your contact details are not hidden from me or I will not know it is you that has placed the order.

Good luck and have fun with this bundle - it is a beauty!


This card would look lovely in a variety of colour combinations, so why not give it a try? 
The stamp set and thinlits dies are available in a bundle saving you 15%


Built for Free Using: My Stampin Blog

Saturday, 4 October 2014

Ornamental Pine with Blendabilities

My second "Blendies" Master class was on this afternoon and we enjoyed experimenting a little more with the Blendabilities. One of the techniques we used was colouring embossing powder with the Blendabilities. I saw a wonderful example by Billie Moan and thought I'd give her technique a try.


I used the Ornamental Pine Stamp set by Stampin' Up! 
Working on Brushed Silver card stock, I embossed the pine branch in white, coloured the the under part of the stem with the Medium Old Olive and the Dark Crumb Cake Blendabilities. I also added the Medium and Dark Old Olive to the pine needles. 
Next I heat embossed the pine cones over the top of the image and coloured them with  Bronze and Dark Crumb Cake Blendabilities. I love how this turned out.


You might be able to see some of the texture from the pine needles running through the top pine cone, but I built up the colour, then wiped it back with an alcohol soaked tissue, then added more colour. I love the texture!

Lots of fun for us today and this technique opens up lots of possibilities with other stamps.
The card is then matted onto Whisper White and Mossy Meadow card stock.

I hope you enjoy my card


Thursday, 23 January 2014

Valentine or Wedding?

I have used this card sketch a number of times and love how it is so versatile. 

Today's card was made as a Valentine, using the classic colours of Black, Vanilla and Cherry Cobbler.


This is a detail shot showing the variety of patterns from Stampin' Up's gorgeous Modern Medley Designer Series Paper Pack( #126926). 
The small silver heart is made using Glimmer Paper - silver (# 124005) 
and the smallest heart from the Hearts Collection Framelits (#125599)
The word "Love" comes from the Expressions Thinlits dies (#132171)and is made from Cherry Cobbler card.
The bow is made using Cherry Cobbler Seam Binding (#120992)

And here is the finished card.


Each of the flags have not been glued all the way so there is some texture and movement in the card. All the paper pieces have been adhered directly to Basic Black card. 

Hope you get some inspiration and will try this card using many different papers. 

If you wish to order any of the products you can do so at my on-line store
Your order will be sent directly to you and you will qualify for any Hostess Benefits that may apply. 

Until Next time

Stay Crafty


Thursday, 21 February 2013

Stampin Up Secret Garden Bundle

I'm loving the Stampin' Up Bundles, not only because you save 15% on the cost, but also because it makes creating so much quicker with no tiresome fussy cutting.

The Secret Garden Bundle can be found on p. 17 of the Seasonal Catalogue and comprises a 7 piece stamp set and a 6 piece Framelits set.

 I demonstrated 2 entirely different styles that could be made with this Stampin' Up! bundle and will show you the "Vintage" version today.


I started by embossing some PRIMROSE PETALS CORE'DINATIONS card stock with the VINE STREET embossing folder (one of the FREE  offerings from this years Sale-A-Bration selection)
Next I lightly sanded it with the STAMPIN' SANDING SYSTEM  thus exposing the light inner core of the card. A quick run around the edge with my DISTRESSING TOOL followed by some light sponging with CRUMB CAKE  ink and then it was matted onto white card.


I stamped the flower images from the SECRET GARDEN stamp set onto whisper White, then coloured them with a BLENDER PEN and Crumb Cake Classic Ink. I stamped the greeting onto Crumb Cake card then ran it through the BIG SHOT with the oval DESIGNER FRAMES Embossing Folder. This was sponged with PRIMROSE PETALS ink. The side edges are torn randomly, and the top edge is distressed. Can you guess which stamp set I used to distress the flowers? Of course it is my favourite! - FRENCH FOLIAGE.  I use this set over and over and really love the versatility for making Vintage cards in particular.
In addition I used an EARLY ESPRESSO STAMPIN WRITE MARKER and a COLOR SPRITZER TOOL to "spray" additional age spots onto the card after it was constructed.


The completed card has SEAM BINDING, CROCHET TRIM, LINEN THREAD, an ANTIQUE BRAD and some hand dyed PEARL BASIC JEWELS.

I really enjoyed making this card and the girls in my class found it easier than it looked. The colour combination is soft and easily distressed helping to create the Vintage effect I was after.

If you would like further information on my classes or techniques that I've used making this card, you are welcome to contact me via my Demonstrator Business Website. Likewise if you'd like to own this bundle you can place your order via the Website and it will be posted directly to you.

This card fits the challenge at
Addicted To Stamps and More Theme Challenge - Vintage 
The Perfect Sentiment Challenge
Crafty Cardmakers
The Papercraft Crew Challenge # 30

Until Next Time

Stay Crafty