Showing posts with label Gorgeous Grunge. Show all posts

Monday, 27 February 2017

Nailed It with this Stampin Up Stamp Set

It took me a while to use the Nailed It Bundle from Stampin' Up! but now that I've started, it will be hard to stop. 

I combined Nailed It with some of the images from Gorgeous Grunge - such a versatile set for creating backgrounds and adding small details to a composition. 


I used a limited palette of Cajun Craze, Night of Navy and Smokey Slate and am really happy with the outcome. The images have been stamped in both Night of Navy and Cajun Craze and some of the outline colour used to shade with a Blender Pen. I really wanted a combination of colours and as many of you know, I love my Aqua Painter, so I added some more colour onto the images with the Aqua Painter. 

The background is made up of stamping Gorgeous Grunge, firstly in Smokey Slate and then stamped off images using Night of Navy.


The little nuts and bolts are wonderful for filling in some of those blank spaces that just need "something" to balance the composition, and the Regals Enamel Shapes provide a finishing touch to the sentiment banner. 

Just a reminder to you all that SALE-A-BRATION  only has 4 more weeks to run. If you want some of these great products for free, you only have to place an order of $90 or more. Like wise if you are thinking about  joining Stampin' Up!, now is the time to do it. 2 additional free stamp sets of your choice can be yours, but only while SALE-A-BRATION is on.

You can choose from any of our catalogues plus the Holiday Carryover List or the Clearance Rack
Here are the products used in this project. If you live in Australia,  you can purchase them on-line if you wish - they will be posted directly to your home address.

Best Wishes and Happy Stamping!


Friday, 24 February 2017

A Special Reason by Stampin Up.


You won't need any special reasons to purchase this bundle from Stampin' Up! It is fabulous, and creates fast and gorgeous cards in no time.

The secret is to get the Bundle.

I used the stamp set in a previous post and you could see how versatile it is, but this set of Framelits dies, called Stylish Stems is amazing.


You can use it as I have on this card, creating beautiful negative shapes that are highlighted from behind by some patterned Designer Series Paper. In this case I used paper from the Falling In Love Paper set by Stampin' Up! You can find that on page 51 of the current Occasions Catalogue.


Layers of interest are easily created using these framelits as you have solid outline shapes plus more delicate detailed shapes to play with.


I used some Foam Adhesive Strips to lift the top layer from the Designer Series Paper. These strips are a little higher than our regular Dimensionals and are perfect for placing about 1 cm inside the edge of the card.
And here is the finished card. Again I've used the lovely free ribbon from Sale A Bration to cover over the area where the leaves meet on top of the card base.


You can still take advantage of the fabulous opportunity to join Stampin' Up! during Sale-A-Bration. But time is running out!
You get all the benefits of being a member of the SU family plus during SAB you can choose 2 additional free stamp sets of your choice. Depending on your choice this can be well over $100 of stamps for free and that is in addition to all the heavily discounted items you choose for your Starter Kit. That means potentially over $400 worth for just $169.

Do you like what you see and think you'd like to earn some extra income from stamping?  
If you are looking for a hobby, a part or full time job, working from home and at your own pace, AND you love craft, then you should consider doing what I do. It is fun and rewarding.
  See more information on my website or contact me with questions you may have. 

Tuesday, 3 May 2016

Mothers Day Card with Butterfly Basics & Gorgeous Grunge

Mothers Day has snuck up on me this year - I thought I had another week, until I received a lovely card in the mail from one of my daughters. Eek, that meant I needed to get a card in the mail for my dear mum who lives interstate. 

Luckily I made this card with her birthday in mind, last week, and although it was originally a Birthday card, it was easy enough to remove the greeting and add a different one. I have another week until her birthday!!!

I used the very versatile Butterfly Basics stamp set from Stampin' Up! with the Marker direct to Rubber technique. I love using my Stampin' Write Markers directly on the rubber of the stamp - it is such an easy way to get multiple colours on one image. 

Here is the card: 


My mum has always loved red and it variations. 
I used Crumb Cake as the card base and Whisper White on which to stamp the image. The colours in the image are Rose Red, Pear Pizzazz and Always Artichoke. 
And of course I just had to use a little Gorgeous Grunge in the background. I probably break all the rules when using this stamp as I do not bother mounting it on a block - I simply press it into the ink and stamp with uneven pressure onto the card. This gives me a more grungy look.


The butterfly is cut out of a Gold Foil sheet using the Bold Butterfly Framelits and this has been topped with a bow of Linen thread. Currently the framelits and stamp set are available as a bundle, but this will change with the new Annual Catalogue on June 1. If you want to save a few dollars (15%) then you should consider getting it now


I added a little Venetian Crochet Lace to one side and blended some of the outline colour into the centres using a Blender Pen. Stampin' Up! Classic Inks are perfect for this technique, and as the Markers contain the same ink as the ink pads, you can achieve the same results.

The card is in the post and I hope mum likes it - it is always difficult being so far away on special occasions and a phone call just doesn't seem the same as being there in person. 

Until Next Time

Happy Crafting


If you would like to make a card like this you can order the following products at my on-line store. The stamp sets will be carried over into the new Annual Catalogue (you can see this on June 1) so it is well worth getting them. As always if I can assist you with further information about this card please contact me.

Thursday, 23 July 2015

Stampin' Up! Achievers Blog Hop - Colour Me New

Hello again and thanks so much for joining us in this month's Grand Vacation Achievers Blog Hop.
This month we have a new theme that requires us to
"Use at least two new 2015-2017 In-Colors in your project. Other colors can be used, however please use at least two new In-colors."
 
You are at Ann Craig's Blog now and I'm so glad you've stopped by.

THEME: COLOR ME NEW! 
I didn't think this would be too hard as I am enjoying most of the new 2015 -2017 In Colors, however I have struggled to create something  for this blog hop that I feel is satisfactory.
This is what I ended up with...

 
I've seen plenty of gorgeous examples of cards using the Vintage Leaves stamp set and thought combining the In Colors would give some wonderful Autumn Colours. I knew I'd be able to neutralise some of the colours by overlapping them and am really happy with the way the leaf turned out. It is a combination of Delightful Dijon, Watermelon Wonder and a little Mint Macaron sponged onto the stamped image and then over-stamped with the original image in Tip Top Taupe ink.
 
 
You can see that I crumpled it a little before placing one dimensional in the centre and adhering both the tip of the leaf and the stem, to the background of the card.
I've used my "go - to" stamp sets - Gorgeous Grunge and Work of Art, to create the background in Mint Macaron, Watermelon Wonder, Delightful Dijon and Tip Top Taupe.
The card base is Whisper White with edges sponged in Tip Top Taupe, matted onto Mint Macaron and Watermelon Wonder. 


The tag is stamped with a greeting from "I Think Your Great" stamp set, and the "celebrate" is from Expressions Naturals Elements that I have sponged lightly with Delightful Dijon ink. 
 

I hope you like what I've made - I'm still not convinced although I am warming to the finished product.
Thanks so much for stopping by....
Now you should hop along to the next link in the list below to get some more awesome inspiration on ways to use the new 2015 - 2017 In Colors.
Simply select the name after my name and you'll be on your way!


Built for Free Using: My Stampin Blog

Friday, 22 May 2015

Stampin Up Grand Vacation Swap Inspiration

I love travelling but really don't like the probability of catching a cold on the plane. Our return flight from the Stampin Up Grand Vacation in Hawaii was very cold and I just knew I'd end up with a cold and sure enough it hit me last night. Feeling a bit under the weather today, but after 3 classes this week I'm not surprised. 
We received a lovely pack of 26 swaps while at the GV and I was taken with the creativity of one that influenced this card that we did at our "Crafty Tuesday" meeting this week. The swap was created by Jackie Ross - thanks for the inspiration Jackie!

And here is my version - I've changed the colours and added a different greeting and a tiny bit of ribbon.


This is a gorgeous card that uses 2 stamp sets - Gorgeous Grunge and Sheltering Tree, from Stampin' Up!  I'm so pleased that both of these sets will carry over to the next catalogue that will be available to purchase from on June 2, 2015.

I used a pallet of the 2014 -2016 In Colors - Blackberry Bliss, Lost Lagoon, Tangelo Twist and Hello Honey, plus Early Espresso for the tree trunk.


 I love how the Gorgeous Grunge set makes a great tree topper - it reminds me of our current Autumn season where the leaves are turning colour and flying off the tree with the wind blowing. I chose the colours to represent Autumn and am very happy with how they combined together.

Stampin' Up is retiring the very cute "Itty Bitty Banner" stamp set and coordinating framelits, that I used for the greeting. You can get this stamp set at a discount on the Retirement List but be quick as it will only be available until June 2nd 2015. 

I added a little bling to the tree canopy by colouring Rhinestone Basic Jewels with my Blendabilities. I'm keeping mine as I love how they work and I really enjoy using them. 
If you would like to re create this card you will need the following supplies. You may purchase them at my on-line store


Built for Free Using: My Stampin Blog

Monday, 11 May 2015

Stampin Up Hawaii Achievers Swap

Hello or should I say Aloha! 

We'll be leaving in a little over an hour, so I just have time to do a quick post on my swaps before I leave. I'm going to schedule the post so it doesn't spoil the surprise for the recipients, But I'm going to be flat out catching up on classes when I get home, so now is a perfect time. 

A sneak peek of the finished card fronts. I love how my colours turned out - they are so bright and summery.


Lots of techniques were needed to achieve the finished card front. I started by using a brayer on A4 size sheets of Whisper White. I love playing with colour and I used combinations of Melon Mambo, Tempting Turquoise, Tangerine Tango and Daffodil Delight. The other colours came about by overlapping colours.


I stamped the swirls in Cherry Cobbler and the leaf and flower image with Memento Black as I just wanted a hint of the images, then I used Pacific Point for the zig zag stamp. I had to leave all this to dry over night then the embossed Gorgeous Grunge stamps in both Gold and White.


The butterflies are also stamped in Memento then water coloured  with an Aqua Painter and classic inks. This is such a quick technique and I think gives a really gorgeous effect.

Finally here is a selection of the finished card fronts. I'm really hoping the recipients like them.


You can probably see the variations brought about by using the brayer in a random and "modern" way without trying to blend the colours perfectly. I really like the feeling of light that shines through on a lot of these, and put that down to the inclusion of Daffodil Delight ink. 

These are very colourful and remind me of the tropics (and the 80's) 
You can find a list of the items used below and if you'd like further information please feel free to contact me via my Demonstrator Business Web Site


Built for Free Using: My Stampin Blog

Sunday, 26 April 2015

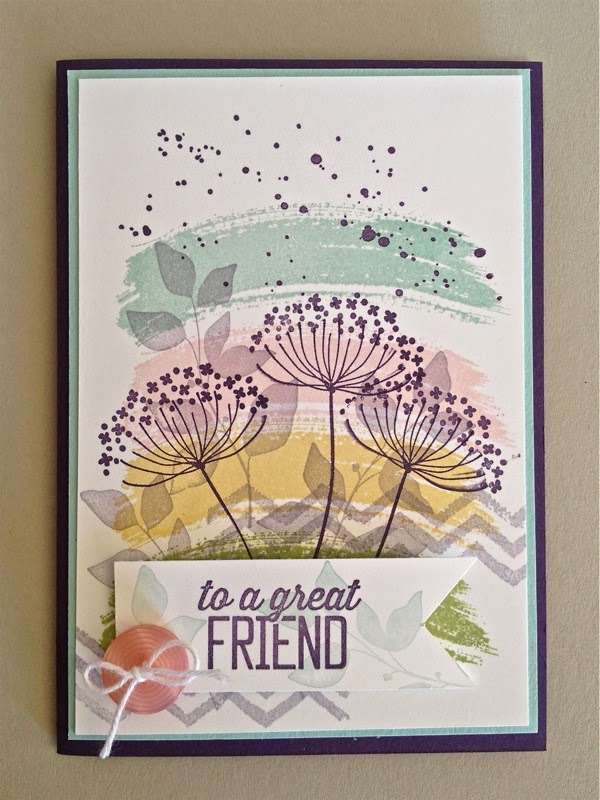
Work of Art and Summer Silhouettes Collage Stamping Card

After owning Summer Silhouettes for quite some time I have only just started to use it, and I now realise how versatile it is as a stamp set.

For today's card I have combined it with another favourite stamp set from Stampin' Up! - Work of Art.  And of course I had to add a little bit of Gorgeous Grange to balance out the design. I decided to use the Subtles colour range of Classic Inks for this card and chose Pear Pizzazz, So Saffron, Pink Pirouette and Pool Party for the background. 


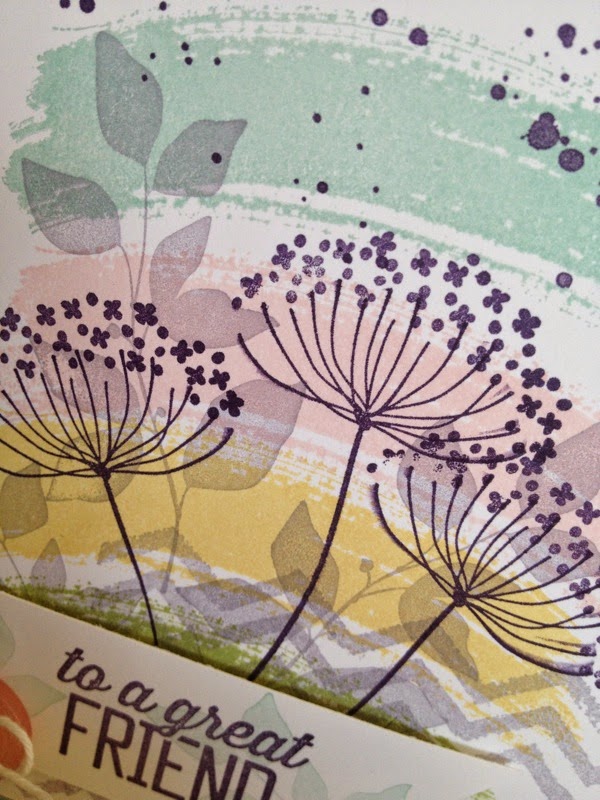
I love a bit of contrast in my cards, but this time I kept with the Subtle colours and opted for contrasting shapes in the background - the zig zag and leaf shapes, rather than contrasting colour. These shapes are stamped in Wisteria Wonder.

Black silhouettes would have been too stark on these soft colours so I stamped the flower silhouettes in Elegant Eggplant and I love the effect. The greeting is also stamped in Elegant Eggplant with soft leaf images that have been "stamped off" in Pool Party. The greeting is raised on Dimensionals and embellished with a button from the Soft Subtles range. Some White Bakers Twine tied into a bow finishes the effect I wanted.

To enhance the colour choices I placed this on a mat of Pool Party card stock then onto an Elegant Eggplant card base.


This was such a fun card to make and my Crafty Tuesday ladies enjoyed it a lot. Collage stamping is one of my many favourite techniques and I think the stamp sets Work of Art, Summer Silhouettes and Gorgeous Grunge combine beautifully.

Thanks for stopping by


Here is a list of Stampin' Up! products used for this card. You can order any of these product from my on-line store or contact me via my demonstrator website me with your requests.


Built for Free Using: My Stampin Blog

Sunday, 12 April 2015

Birthday Flower Medallion

Here is a quick Birthday card using the combination of flower stamps and punches. Stampin Up is so well known for its coordinating products and this makes card making quick, easy and gorgeous. I have used the splotch from Gorgeous Grunge in Hello Honey as the base - I think this gives the other two colours a lift and takes a little away from the background being stark.

The leaf image from Kinda Eclectic, is stamped in Mellow Moss classic ink and then stamped off a number of times to provide the lovely tonal effect.


 The layout is kept simple with the cluster image balanced by the Greeting, which can be found in the Butterfly Basics stamp set by Stampin' Up! Basic Pearls are used in the centres of each flower to help keep the entire effect light.


 Here are the products you would need to complete this card. Please feel free to contact me or place an order at my on-line store
Built for Free Using: My Stampin Blog


Friday, 10 April 2015

Gorgeous Grunge Screen Card

I've enjoyed seeing a few screen cards posted lately so thought I'd have a go myself. 

This card uses some of the elements from Stampin' Up's Gorgeous Grunge and Kinda Eclectic stamp sets, combined with flowers stamped and punched with coordinating punches. The flowers are from the stamp sets, Flower Shop, Petite Petals and Petal Pot Pourri.


The front of the card features a composite flower from all 3 stamp sets, coloured with a Blender Pen and Classic Ink (Blackberry Bliss) and raised up with a Dimensional between each layer. 

The colours used are Blackberry Bliss and Lost Lagoon and the range of tones is achieved by "stamping off" the image. The 2014 -2016 In Colors are perfect for stamping off as the richness of their colour allows for up to 4 stamps without re-inking.


The next 2 panels showcase the beautiful leaf image from "Kinda Eclectic" together with images from "Gorgeous Grunge".

The top of the screen is created using the Confetti Heart Border Punch and the legs of the screen are punched out with the Curly Label Punch. 

If you would like to re create this card you will need the following products. Feel welcome to contact me if you would like additional help.

Built for Free Using: My Stampin Blog

Tuesday, 24 March 2015

Crafty Tuesday Brayer Class

More fun with the brayer at Crafty Tuesday morning class today. Liz, one of my Stampin' Up! team members is moving to Cairns so she had the choice of what she wanted to do and Brayer techniques is what she chose.

I admit that I had a few "students" who were not happy during the early part of the class. I spent some time demonstrating using the brayer on Whisper White, Shimmer White and Glossy White card stock. Unfortunately Stampin' Up! no longer stocks the Glossy White (which happens to be my favourite base for brayering) but I wanted to show them the variety of finishes that could be achieved. 

I also wanted to stretch the creativity of the participants so challenged them to work "outside their comfort  zone" and try a variety of methods. As many of you know Brayering can be quite difficult and take a bit of practice, but by the end of the class we had some really great results.


I really like the effect achieved on this card using classic inks on Whisper White. Almost everyone tended to apply too much ink too quickly but this crafter used a lighter rolling motion and although she thought it was not good because it was not smooth, I soon convinced her to "see" various scenes in the colours. She added a couple of stamped images from "Wetlands" stamp set by Stampin' Up!, tied a piece of Linen Thread around it and matted on Black and White card. Lovely! I love the colours and balance achieved in this sample.

When the ladies got a bit heavy handed with the ink, I suggested they turn these samples (on the right above) into modern abstract cards that would be great for the men/boys in their lives. There are no better stamp sets to do this than Gorgeous Grunge and Work of Art stamp sets. You can find both of these in the Annual Catalogue - page 165. We actually used a very old Kaleidoscope stamp pad that I have had for  9 years as I purchased it when Stampin Up stocked this item. I wish they would bring these back too! But, by adding some Cherry Cobbler images and embossing with gold and white, an attractive abstract card has been achieved. Again the choice of mat and card base colours is important in the finished product.


These 3 images above are brayered onto Glossy White and you can see the difference in smoothness. It is much easier to get the colours to blend on the smooth surface of the Glossy White, and easier again if paler colours are used. 


By the end of the class everyone was looking into the brayered backgrounds, seeing different scenes or images. We all agreed the lower one is a face ( a little abstract but none the less - a face) Turn this sideways and you see a great mountain ranged or a rocky outcrop near the ocean - you just have to let your imagination run free, and I'm pleased to say I think everyone was doing that by the end of the class. 

Finally I have my example that I created on Whisper White.


You can see the build up of layers and variety of colours used. Also the combination of techniques:- brayer background; stamped images: heat embossed images. I really enjoy collage stamping and found this morning lots of fun and quite satisfying. Class went way over time but we all had a really good learning experience.

I hope you gain some inspiration from these samples and will give this a try. Experimenting is the basis of creativity - try something different - whether it be a combination of techniques, combining unusual colours and patterns or simply creating images and matting them in unusual ways.

Below is a list of many of the products used in these samples. If you would like to take advantage of the last few days of Sale A Bration and place an on-line order at my store, just use this code: 7VTN9W2P for the chance to win an ENVELOPE PUNCH BOARD. Make sure you leave your contact details in the order as everyone who participates this week will go in the draw. 
Orders close on Monday March 30. 

Built for Free Using: My Stampin Blog

Sunday, 27 July 2014

Collage Stamping Made Easy With Stampin' Up!

Collage Stamping is so much fun and Stampin' Up! have made it an easy task with some of the new release stamps in the new Annual Catalogue. You should check out pages 164 - 165 as these pages contain the 3 stamp sets that combine beautifully together to create exciting cards.

Collage, strictly speaking in Art terms, is:
"A piece of art made by sticking various different materials such as photographs & pieces of paper onto a  backing."
But it can also mean: "a collection or combination of various things", so I think by combining a number of different stamp sets that we are making a collage. Also the concept of stamping over the top of other images relates to the collage concept.

Kinda Eclectic, Work of Art and Gorgeous Grunge are just perfect for this style, and recently I made some cards using different colours and different layouts to demonstrate just how versatile these sets can be.


I used the Beautiful Bunch Stamp set (page 158 AC) as the focal point for my cards, and employed the method of stamping off to obtain the variety of tones in the colours.


Are you loving the purple of the flower? it is one of Stampin' Up's new In Colors for 2014 -2016 and is named Blackberry Bliss. I think this will be a favourite of many people.

And here is another card using the same sets but different colours.


Quite a different look! These colours are Baked Brown Sugar: Lost Lagoon: Strawberry Slush, stamped onto Very Vanilla Card. 
I hope you enjoy my samples and if you would like any of the products you can them order at my on-line store: 
The items will be sent directly to you and you will have me as a contact to assist you with after sales service. 

Until Next Time

Stay Crafty!