Showing posts with label jac-inks Challenges. Show all posts

Monday, 6 June 2011

jac-inks Challenge 10

Hello to all you Stamping Challenge lovers out there.

I can't believe it is time to post jac-inks Challenge 10 already. That means 20 weeks have gone by since we started  our new Challenge blog. Scarey stuff, when I think of how fast this year is flying by. 

The jac-inks challenge this time is a sketch.


And here is the card I made inspired by that sketch.
The colours are"
Pear Pizzazz
Whisper White
Tempting Turquoise
 Rich Razzleberry


The backing paper is from the Stampin' Up! Hostess Level One - In Color Designer Series Paper Pack, and it's been embossed using the Big Shot and the Finial Press Embossing Folder. I love how the texture  creates additional interest in the background.


 The tree image is from Trendy Trees and the house is from a Sale-A-Bration set form 2010. I really like the "naive" style these two stamp sets create when used together. I drew the grass in by hand using  the Pear Pizzazz Stampin' Write Marker, and the Faux Stitching using the Tempting Turquoise Marker


The embossed "Thanks" is a cut down version of the Embosslits Die - Thanks. It is a Stampin' Up! exclusive die and is very versatile as well as very pretty.
It's fun using old stamp sets - and finding different ways of using them, so why don't you pull out one of your old stamp sets or use a current one, and join in the Challenge.

Until next time,

Stay Crafty!


Monday, 23 May 2011

jac-inks challenge #9

The challenge over at jac-inks this week is WARM COLOURS, and it's nice to be working in warm colours when it is a bit nippy outside.


The colours I've chosen are from the Stampin' Up!® range, and include:

Real Red
Daffodil Delight
Melon Mambo
Pumpkin Pie

Card stock is:

Whisper White
Real Red
Melon Mambo
Daffodil Delight


I used the wonderful Manhattan Flower Embossing folder as both an embossed page and a debossed page, then I inked up my brayer and rolled it lightly over the embossed image so I could colour the raised areas. You can see some of the ink adheres to the background, but that was somewhat intentional to take away a little of the starkness. The debossed image has 4 layers of ink: Daffodil Delight, Pumpkin Pie, Melon Mambo, and Real Red. The edges were then sponged with Melon Mambo.


I used the fabulous new Bigz XL Die  "Tasteful Trim" for the zigzag and scallop edges, (available in the Autumn/Winter Mini, and the leaves are cut down versions created from the Leaves #2 Die. A little Crochet trim and Linen thread complete the embellishment.


Speaking of embellishments - this rose is made from Melon Mambo card stock and cut out with a die. You could however just cut a circle then spiral cut it and roll it up. 

I attached the base with some Big Shot Multipurpose Adhesive Sheet punched out with a 3/4inch circle punch. Love those Adhesive Sheets - they make everything so easy.

After rolling and adhering the base of the rose, I sprayed it with some Gold shimmer Mist made from Shimmer Paint. This softened everything up and allowed me to shape the "petals" more easily. 
A final touch of 2-way glue pen and Dazzling Diamonds for additional highlights.

Pop on over to jac-inks and have a look at the other Design Team samples. You may even decide to warm up by creating your own warm coloured project. 

Until next time

Stay Crafty!


Tuesday, 10 May 2011

jac-inks Challenge # 8 - Heat Embossing

As I frantically try to get ready for traveling interstate for our Stampin' Up! Convention, I realized I needed to post another challenge for jac-inks. 

We are scheduled for the TECHNIQUE CHALLENGE  

of HEAT EMBOSSING

and I'm very pleased that it is such an easy challenge. 

Here is my DT sample:


I used the Emboss Resist Technique where the main image is inked with Versa Mark then sprinkled with CLEAR EMBOSS POWDER. This is then heated to create a clear coating over whatever background/patterned paper you wish to show through the image. 


I did some dry embossing on the background DSP - just love that Square Lattice Embossing folder from Stampin' Up!


Create your own gorgeous flowers with 1"circle punches and the Little Leaves Sizzlits Die.


Add highlights with the White Gel Pen. I did this on the corner tabs as well as around the central image. You will also note some highlights on the stamped image too, if you look closely.

And here is the completed card: 
Colours used are : Pear Pizzazz, Poppy Parade, Peach Parfait and Elegant Eggplant.


Until next time

Stay Crafty!


Tuesday, 26 April 2011

Colourful Inspiration

I love the INSPIRATION PHOTO  for the jac-inks Challenge # 7 and must admit to many ideas running through my mind. However, with a house full of guests and my craft studio doubling up as a guest flat - my ideas stayed inside my head!

I'm not complaining, as I've had a wonderful time with family and friends  over the Easter / Anzac Day break and today I managed to get one of the ideas onto paper. 

Here is the Challenge Inspiration Photo.


Don't you love the rich colour combination, the variety of patterns and shapes, and the fact that an elephant can be made to look so decorative?

And this is my first solution.


 I started off by using the Direct To Rubber technique of colouring the stamp with my Stampin' Write Markers.

Colours are Tempting Turquoise, Melon Mambo, Tangerine Tango and Real Red. I randomly stamped the images across the lower half of some Whisper White card, then punched along the edge with Pinking Hearts Border Punch.


The large flower was stamped onto Melon Mambo card and embossed with clear embossing powder, hand cut to shape and raised up on Dimensionals to add some depth to the card. Rhinestone Brad and some small Basic Rhinestones.
The gold section (which is just Christmas wrapping paper) was dry embossed with the beautiful Stampin' Up!® exclusive Finial Press Embossing Folder, fussy cut along one edge and attached over the first lot of stamped images. 


Repetition of the border punching, a combination of patterns and images and the use of sparkle accessories help to create the rich feeling I perceived from the Inspiration Photo. 
I rediscovered the delightful and intricate patterns of the now retired Friendly Flowers stamp set from Stampin' Up!® found they combined well with the simple but bold images from Petal Pizzazz.


The photos are a little darker than in real life, but I think you'll be able to get the idea. 

Hop on over to the jac-inks Challenge blog, visit the other DT members and challenge yourself to create something a little exotic.

I hope you've enjoyed your visit to my blog.

Until next time,

Stay Crafty!


Tuesday, 12 April 2011

jac-inks Challenge #6

Hi everyone,

It's been another one of those weeks where I seem to have been racing to catch the clock and stressing that I wouldn't meet dead-lines. Last night I did something I hardly ever do - I MADE A LIST! 

Eeek! That is just way too organized for my chaotic life, but it did help me to prioritize all the things I had to complete by tonight and I'm pleased to say this post is the last item on that dreaded list. And tomorrow I'm going to do some stamping just for the fun of it.

Now this post is all about a very quick card I whipped up for "jac-inks" Challenge #6.

And when I say quick - I mean quick.
I did some paper weaving for the background, using some of the fantastic Stampin' Up!® papers from the Hostess Free In Color Designer Series Paper Pack.

I used the Concord Crush and the Poppy Parade


Next I added a paper flower from the Paper Daisies (item 119243) and stamped the lovely mandala image from the Artistic Etchings stamp set from SU. I punched this out with the 1 3/4inch Circle Punch I sponged a little Poppy Parade ink around the perimeter.


Flowers need butterflies, right? And what better to give you a selection of embossed and different sized butterflies than the Beautiful Wings Embosslits Die available also from SU.


Add a small tag, some grosgrain ribbon and a frame of Concord Crush in another pattern and the card is complete.

Hope you like it - it is a bit different from my usual style, but I love to try a bit of this and a bit of that at various times.

Until next time,

Stay Crafty!


Monday, 28 February 2011

Hawaiin Inspiration jac-inks Challenge 3

Today I have a couple of bright and summery samples I made as inspiration for the latest "jac-inks" Challenge #3

For some reason I just could not get away from flowers, but that's OK as I had loads of fun making up different flowers from shapes cut with the Big Shot.

My first sample is a scrap page that I envisaged as soon as I saw the inspiration photo. How I'm going to place the photos, I just don't quite know yet, but I'm sure something will just "happen" into my mind one day and it will all work out.


I used a flourish stencil to create the "waves" and all the other shapes are created with the Big Shot.


A little sponging on the layers of each flower helps to give them depth, and you'll notice Rhinestone brads in the centres of most of the flowers. 


The detail shot shows the variety of flowers that can be made, and the little butterflies help to spread dots of orange throughout the layout.

The next sample is a card. 


This time I've stamped and water-coloured the flowers, using my ink pads and an Aqua Painter. The background is created by pre-inking the dry embossing folder, and the leaves are cut with the Little Leaves  die.


Hope you like these samples and that you'll pop on over to "jac-inks" for some inspiration and to play along with the challenge. All the products used are from Stampin' Up!® and you are welcome to contact me for further information or to place orders. 

Until next time 

Stay Crafty


Tuesday, 15 February 2011

Happiness Shared

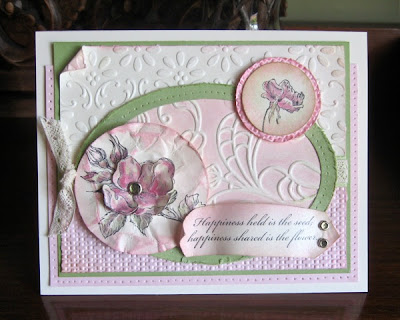
I'm always happy when I'm stamping - in fact I'm always happy. I wonder if that means I spend all my time stamping! Those of you who know me well will no doubt believe that, but I do enjoy other interests as well. However, today I'm going to share some more stamping with you and that is my DT design for the jac-inks Challenge #2 which is a SKETCH challenge.


I've used the Stampin' Up!® stamp set named "Happiness Shared". A sweet little set of 4 images that are just right for colouring with chalks or inks.


I've turned the sketch on its side and realigned the greeting - just to make it my own.
The larger flower has been stamped twice then fussy cut and raised on a dimensional.


The detail shot shows all the textures used, ranging from Stampin' Up! exclusive dry embossing folders to simply scrunching up a die cut circle then inking and sponging colour over it. And the Chantilly Crochet Trim provides additional texture.


Pink and green, being complimentary colours, create a neutral and therefore softening effect when applied over each other. You can see the effect gained in the sponging inside the circle of this smaller image. Lots of distressed and sponged edges add to the aged look of this card. 


I made up some Frost White Shimmer Paint into a mist by mixing it with alcohol and water, and sprayed the entire card. It has given it a lovely soft sheen.
Colours used in this card are:
Certainly Celery
Pretty In Pink
Pink Pirouette
Rose Red

It would be wonderful to see you pop over to jac-inks Challenge blog and enter our Sketch Challenge. The Challenge goes for 2 weeks starting February 15th. We'd certainly love to see your take on this sketch.