Showing posts with label Big Shot Projects. Show all posts

Monday, 24 October 2016

Pretty Pines Christmas Card with Stampin' Up!

As we draw closer to Christmas I feel it is OK to continue making my Christmas cards - yes I've been doing this all year using the Christmas selection from the Annual Catalogue, and now I'm enjoying the gorgeous products from the Stampin' Up!® Holiday Catalogue.

Today I've used the  Pretty Pines Thinlits Dies  to create a quick card. I love the fancy finish of the pine cone, cut using my Big Shot and Gold Foil Paper.  It has been adhered over the top of a Cherry Cobbler die cut pine cone using the Fine-Tip Glue Pen.

The fine detail of the Pine leaves is gorgeous and so versatile. Imagine using these lovely leaves behind posies of flowers cut using other Stampin' Up! dies. I used Garden Green card stock for these leaves.

The layout of the card is simple:
1 card base (landscape orientation) Thick White Card
1 strip of Crumb Cake 14.9 x 8.5 cm
1 strip of patterned DSP 14.9 x 7.5 cm
1 strip of Whisper White (the very best choice for stamping on) 14.9 x 6.0 cm

Remember to distress the edges of the Crumb Cake and Whisper White, arrange the die cut elements leaving room for your greeting and adhere everything to the base card. Use Fast Fuse for the card layers and Fine Tip Glue Pen for the finer elements.

The complete card:


The bow is made from retired Cherry Cobbler Seam Binding but you can easily substitute Real Red behind the Pine Cone and use Real Red 1 cm Stitched Satin Ribbon for the bow. 

If you would like to purchase any of these products you can do so via my on-line store (if you live in Australia or its Territories)


If you are looking for a part or full time job, working from home and at your own pace, AND you love craft, then becoming a Stampin' Up! Demonstrator will be of interest to you. 
Contact me  or find further information on my Stampin' Up! Web site


Until next time
Happy Stamping

Wednesday, 28 August 2013

Soho Subway Fathers Day Card

Today I have one of the cards we are making for Fathers Day Card Class tonight. I've done very little stamping on this one (love my stamping but sometimes it takes more time than I have) and instead have used some of the gorgeous papers from the Soho Subway Designer Series Papers by Stampin' Up!


My Big Shot featured a lot in this card too. Don't you just love how it is so versatile - textures, shapes almost anything you want to step your card up, and even make a gorgeous liner for the Stampin' Up@ envelopes.

The card base is Soft Suede and it is covered with another piece of Soft Suede that has been embossed with the Woodgrain Embossing folder. Next the Deco Labels Framelits add a perfect focal point to draw the eye to the greeting. You'll find that stamp in the "Delightful Dozen" stamp set on page 27 of the Annual Catalogue or you can view all these items plus the My Digital Studio downloads at my on-line ordering store

I've also used Very Vanilla and Always Artichoke card stock and they all have Soft Suede sponged around the edges. The Soho Subway paper is cut into 2.5cm strips and the "V" at the end is created with the 1" square punch. Finish off with your choice of brad from the Antique Brads collection from Stampin' Up!


The greeting is stamped in Early Espresso ink as I like to use darker colours for any words I stamp, and you can just see a glimpse of one of our new products - Envelope Liners Framelits Dies. They create a lovely finish for your envelope and a very easy to use.

I'll post the other card shortly.

I think these cards would be great for any male occasion - a Birthday - friend etc. All you need to do is change the greeting.


Until Next Time

Stay Crafty


Wednesday, 8 June 2011

Fabric and The Big Shot - Mini Albums


 I'm really enjoying exploring the many possibilities of using fabric with the Big Shot Die Cutting Machine, and I have some examples of a couple of Mini Albums I made recently.

The first album is covered with Ivories Natural card stock that has been embossed with the Stampin' Up!® exclusive Vintage Wallpaper Embossing Folder. I used the Spiral Border Punch along the LHS of the page so that the card covered the entire front of the Mini.


I put 6 layers of Calico in the Big Shot  and cut them out with the Flower Folds Bigz XL die. I found 8 layers ended up with the "score lines " cutting through so I had flowers with no petals!!!
This flower was adherred with a hot glue gun and the petals were scrunched individually to give a worn and rustic look to the finished project. 

Because I don't anticipate washing these flowers, I used Stampin' Up! Classic Ink (Always Artichoke) to stamp directly onto the calico. It gives a lovely soft image.

The "friends" tag is a rub on from some retired SU Rub Ons and the tag has been aged with sponging and some faux stitching. 


I popped a fabric embossed mini envelope on the front of the next album and use Rose Red as my stamped colour on the flower.  Not so much scrunching on this flower and the centre is highlighted with one of Stampin' Up!'s co ordinating buttons.


Hope you like them and,

Until Next time

Stay Crafty!


Monday, 6 June 2011

Mini Tote by Mr Big Shot

Hi stampers,

As promised here is the second of our projects from my Big Shot and Creative Craft day - a very cute Mini Tote made with the Stampin' Up!® exclusive Top Note die. This die is one of our most versatile and popular shapes, and can be used in so many ways. (check out other ideas using the Top Note label on the sidebar)


And aren't these cute? 

You can see the embossed fabric sides to the mini totes and we created the ribbon flowers and fabric tags too! All products used (except the fabric) are from Stampin' Up! although some are from my stash and are no longer available. The fabric is cotton based from my vast collection of fabrics - I used to do lots of sewing before I discovered stamping!


We lined the Totes too. It is all so easy.

To show the girls different methods of adhesion, we used the fantastic Big Shot Multipurpose Adhesive Sheets (Autumn/Winter Mini p. 9) on the outer sides of the tote and the Anywhere Glue Stick on the inside. Both work equally well for projects like this. 


Another of our projects was to create some tiny envelopes to pop inside these little totes.
Again, the fabric was adhered to card stock, then the shape was cut out with the Big Shot - this time using the Stampin' Up! exclusive Scallop Envelope Die (p. 154 Idea Book & Catalogue) and then the shapes were placed inside the Vintage Wallpaper Embossing Folder, and wound through the Big Shot to achieve the texture you can see in the photo.


Just imagine these as a cute little Christmas bag or something purpose made for a special occasion. Change the fabric and width of the tote base and the potential is unlimited. 
If you don't have loads of fabric you can use some Stampin' Up! Designer Series Papers that give delightful results too. 

If you'd like measurements for this bag just contact me via my Demonstrator Business Website and I'll help you out.

There are still a couple more projects from our Craft Day, but I'll post those later - maybe tomorrow. It's my regular day with my grandson today and we have swimming classes to attend! 

Until next time

Stay Crafty!  


Friday, 27 May 2011

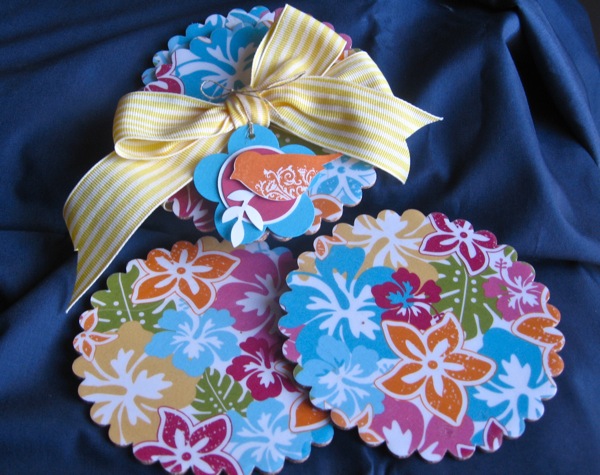
Stampin' Up! Coasters

I had a bit of fun this afternoon trying out a new project that came in our monthly Demonstrator magazine from Stampin' Up! It arrived in the mail this week and luckily I had everything on hand needed to create this project.


Supplies needed: 
1 x Designer  Series Papers (30.5 x 30.5 cm)
1 x Window Sheets (30.5 x 30.5 cm)
1 x Big Shot Multipurpose Adhesive Sheets (30.5 x 30.5 cm)
Thin Cork Board
Big Shot Die Cutting Machine
Bigz Scallop Circle Die
Punches: Fancy Flower XL; 3.5 cm Circle; 3.2 cm Circle
2-Step Bird Punch
Linen thread
3.2 cm Striped Grosgrain - Daffodil Delight
Pumpkin  Pie Classic Ink


There are 4 Coasters in this set - each with it's own glossy top to keep those nasty drink circles away from your table surface.


The gift tag is made mostly from punched card. However the bird is stamped with Pumpkin Pie Classic ink using an image from my Hostess Level 1 set - Punch Potpourri. Very quick and easy!


You can see the layers of cork, adhesive, Designer Series Paper  (of course you could choose any style of Stampin' Up! paper you like) and Window Sheet. They are are put together and then run through the Big Shot in one easy motion.

What a wonderful personal gift these make.
If you'd like to learn more -
contact me via my Demonstrator Business Web Site

 I'm always happy to share Big Shot projects and ideas through workshops.

Why not take the opportunity to book your own workshop in June?

We have a fantastic HOSTESS REWARD PROMOTION throughout June 2011 - an additional free $70 for all hostesses of qualifying workshops.

Contact me for further information.


Until next time

Stay Crafty!


Sunday, 17 April 2011

Scrap Page Technique - Embossed Vellum

I've been enjoying a bit of scrapping lately and decided to use the technique of dry embossing on vellum as the basis for the April Scrap Classes. 

As usual, I designed a Layout for the month that is intended to give the class attendees a guide for their projects. It must have been a fairly universal layout this month because I was amazed to see how many of the girls kept to it. (this is not always the case in my classes!)


I found an old photo of my family from summer in 1984 -85 and decided to scrap that as it included the pinks and greens that I wanted to use for this project.

We were just getting ready to go to live in the USA for 12 months while my husband did a post doc at Colorado University, Boulder Campus. What a lovely year that was - so much adventure and such a wonderful experience for the girls.  So,  here is my page... hope you like it.


I've used lots of Stampin' Up!® products  including:
12 x 12 inch Pretty In Pink Card Stock
12 x 12 Whisper White Card Textured Stock
Paper Daisies
Antique Brads
Big Shot & Simple Letters Alphabet Dies
Bigz Die - Beautiful Butterflies
Textured Impressions Embossing Folder - Elegant Lines 
3.2 cm Striped Grosgrain Ribbon - Old Olive
Designer Series Paper 
Vellum Card

Notice the pink patterned strip along the base? that is the left over bit from cutting out a Fancy Favour Box template with the Big Shot. It makes a great detail for pages with a nice fancy side to it. 
I've used lots of different patterns - stripes. dots, swirls and circles.


I love how the vellum card takes on a deeper white for the embossed patterns. Some embossing folders work better than others, but this Elegant Lines folder is terrific for this technique. Hope you like the page and please feel free to follow the scrap map if you wish. If you do, leave a comment and link to your blog post as I would love to see your results.

Until next ime

Stay Crafty


Wednesday, 9 March 2011

March Scrap Class Layout.

Hi everyone. This is my interpretation of our March scrap map. It's a simple layout this month that allows for plenty of scope for individual colour and paper preferences.


This is my maternal grandmother in her wedding gown. Actually the photo has just been placed there to show how the layout is intended, so when it's all finished I'll post again. Some of my scrapping girls like to have an idea of the layout prior to the class - just helps a little in deciding what photos to bring etc.

I'm lucky enough to still have my grandmothers wedding gown - a beautiful example of the fashion at the time (1920's) with exquisite pearl and hand stitched accessories.

The bow on this layout has been a huge hit with the ladies at the first 3 classes this month - it is so simple to make and never fails to give you a beautiful bow. The papers, ribbon and brads are all Stampin' Up!®

Until next time

Stay Crafty!


Tuesday, 8 March 2011

Getting Ready for Easter

I have a busy few weeks ahead of me with an interstate trip for 10 days and a number of workshops, classes and scrap nights, so I thought I'd get a couple of Easter items under way.

I recently purchased the lovely "Easter Blossoms" clear mount stamp set from Stampin' Up!®, and although Easter is in autumn in the southern hemisphere, I love the blossoms and thought they would make a lovely background for my bunny on these little Easter Baskets. Also I love the Paper Players challenges, so I'm going to pretend I'm visiting good friends in the USA!


Paper Players Challenge # 37 this week is Spring has Sprung - hop on over to their blog and see some of the fabulous DT designs. What could be more "springy" than baby bunnies and blossoms?


The baskets are made from the Big Shot "Fancy Favor" Box die. It is such a versatile die and even scores the card for you so you can easily fold in the correct places.


I've hand coloured the rabbit and blossoms with a blender pen and classic ink by Stampin' Up! and kept to a traditional colour theme for a girl (pink) and a boy (blue).
Colours used:
Pretty in Pink
Baja Breeze
Chocolate chip


The bunny is cut out with paper snips, and raised on dimensionals. The greeting is stamped onto vanilla card, punched out with the Extra Large Oval Punch and then I sponged around the edges with blue and brown ink. It struck me after I finished that this was in the shape of an egg and the sponging helped to create a roundness.

If you are looking for some new challenges, have a look at "jac-inks Challenge #3" It is an Inspiration Challenge that allows you full creative process and interpretation. These are fortnightly challenges - so plenty of time to get a project completed, but don't forget to up;load it in time!

As this stamp is one of my first stamp purchases nearly 6 years ago, I'm entering this project in the Creative Belli Challenge #112 - Animals.
Paper Play - Shabby Chic/Vintage
SU Only Challenge 14 - Favourite RetiredStamp

Tonight I'm having my first Canvas Scrapping class. I'm very excited for this occasion, and can't wait to show you some of the results as the ladies who have booked into the class have very diverse talents and we always end up with so many different solutions to the one set of guidelines.

As a teacher, this is my main objective - develop each persons individual talents and stylistic preferences and enjoy the fantastic creative results that are achieved.

If you live in the Canberra or regional NSW area and would like a workshop or class, you can contact me for further information


Until next time,

Stay crafty!


Monday, 28 February 2011

Hawaiin Inspiration jac-inks Challenge 3

Today I have a couple of bright and summery samples I made as inspiration for the latest "jac-inks" Challenge #3

For some reason I just could not get away from flowers, but that's OK as I had loads of fun making up different flowers from shapes cut with the Big Shot.

My first sample is a scrap page that I envisaged as soon as I saw the inspiration photo. How I'm going to place the photos, I just don't quite know yet, but I'm sure something will just "happen" into my mind one day and it will all work out.


I used a flourish stencil to create the "waves" and all the other shapes are created with the Big Shot.


A little sponging on the layers of each flower helps to give them depth, and you'll notice Rhinestone brads in the centres of most of the flowers. 


The detail shot shows the variety of flowers that can be made, and the little butterflies help to spread dots of orange throughout the layout.

The next sample is a card. 


This time I've stamped and water-coloured the flowers, using my ink pads and an Aqua Painter. The background is created by pre-inking the dry embossing folder, and the leaves are cut with the Little Leaves  die.


Hope you like these samples and that you'll pop on over to "jac-inks" for some inspiration and to play along with the challenge. All the products used are from Stampin' Up!® and you are welcome to contact me for further information or to place orders. 

Until next time 

Stay Crafty


Monday, 21 February 2011

Step Up Those Old Cards

Today I had fun pulling out some old cards that needed a bit of a re-vamp. I found a set of card fronts that I'd made for a Stamp-A-Stack a year or so ago, and decided that they needed some more "oomph". 

I've found the old cards just don't pass muster without a bit of dry embossing on them - what did I do before the wonderful Big Shot? - so I gently removed the fronts, and re-positioned and in some cases re-cut the focal motif,  and added embellishments, pearls and die cut leaves from the Stampin' Up!® exclusive "Little Leaves" Sizzlits Die. 

This didn't take very long and was quite a pleasant way to spend a rainy afternoon. 

Here is one of the original card fronts.

 And here is the first one I recreated


I look at that beautiful "Finial Press" embossing in the background and wonder why it took me so long to purchase it. The sparkle on the leaves is Dazzling Diamonds sprinkled over areas drawn in with the 2-way Glue Pen.


The main flower was done using the Water-colour technique. I use water-colour paper and my Stampin' Write Markers and an Aqua Painter. Love that technique and must get back to some more of it soon.


The card looks quite different when green leaves are added and the dry embossed background is more abstract.

The tiny pearls from Stampin' Up!'s "Basic Pearls" are self-adhesive and just right for detailing little areas of the flower. 


With this one I ditched all the background and chose a more restricted colour scheme. I think it is a lot more feminine


See how the pearls come in 3 sizes, and being self adhesive, they are easy to handle. 
HINT: I find the best way to handle them is to use a craft knife to lift them off the backing paper and place them directly onto the area of the card where you want them. A gentle press with your finger and they stay put!

I had a lovely surprise when I looked at my friend Lovely Linda's blog tonight. She was awarded a Stylish Blogger Award and very kindly passed the award on to me.


Now I believe I have to reveal 8 facts about myself and pass the Award onto 8 others who inspire me.

This is quite hard, but here goes......
1.  I married my "high school sweetheart" nearly 39 years ago - yep we are still married!
2. I have 3 daughters - all married - 3 lovely modern sons-in-law and 1 gorgeous grandson.  They all cook including the 2-year old.
3. I joined Stampin' Up! in May 2006 and love every minute of it. I'm now a Senior Manager.
4.  I was an Art Teacher by profession.
5. I've been actively involved as a participant, coach and mentor in Calisthenics for 55 years.
6. In 2000, I was honoured to receive an Australian Sports Medal for my work with calisthenics.
7. I love to travel and have visited the USA, Great Britain, Mexico, Java, Bali, Singapore, Fiji, Alaska, Canada and hopefully will get to Italy this year.
8. I'm an eclectic stamper - I'll try all different styles and colour combinations, but most of all I like to master new techniques and see what sort of journey they take me on!


I would love to forward this award on to:
Bronwyn

Enjoy your award ladies and thanks so much for your inspiration in so many different ways. It is amazing how we start with the same products and end up with creations that are so different. Long live unique styles!

Until Next time

Stay Crafty!


Sunday, 2 January 2011

Tag in Neutrals

As part of our very first blog challenge over at "jac-inks" Challenge Blog, I designed this tag to fit in with the Colour Challenge of Neutrals plus one Colour.


The Neutrals I chose are from the Stampin' Up!® range, and include River Rock, Soft Suede, Early Espresso and Very Vanilla.

I'm really enjoying playing with some texture too, and of course the wonderful, sturdy Big Shot creates some great textures. I've covered a chipboard tag from an old SU On Board set with some Vanilla card stock that has been run through the Big Shot in the Square Lattice Embossing Folder. I aged it a little by sponging the edges, first with River Rock, then Soft Suede.


Now you may not recognize this stamped image, because it is from one of 
Stampin' Up's SALE-A-BRATION  sets that are absolutely free from January 25th - March 31st, when you fulfill certain purchasing requirements. 

This is a super set - so versatile with 9 images that compliment each other. 

I stamped the images in Early Espresso and used a blender pen with old Olive (my chosen colour) Soft Suede and Espresso for the shading. The flower head has been lifted with some Dimensionals, as has the scrolled shape that I die cut one day with my friend Linda.
I used some thick Twill Tape and a little Olive Taffeta to display the greeting tag and tied some of the new ribbon from Stampin' Up! - 3.2mm Early Espresso Taffeta Ribbon.